Gingerbread Cookie Recipe: Kid Friendly and Fun!

Gingerbread Cookies Recipe (that actually tastes delicious!)

I used to think I hated gingerbread cookies. Every version I’d ever tried came from a package on a store shelf—dry, overly hard, and strangely bland despite being packed with “flavor.” They always tasted artificial to me, like a vague idea of gingerbread rather than the real thing, and I couldn’t understand why people got so excited about them during the holidays. I wrote them off completely, assuming gingerbread cookies just weren’t for me.

That all changed once we started making gingerbread cookies from scratch. Using simple, real ingredients—warm spices, molasses, butter, flour, and sugar, most of which you probably already have on hand—made all the difference. Suddenly the cookies were soft, fragrant, and full of cozy flavor, not weighed down by fake flavorings or seed oils like the store-bought ones. It turns out I never hated gingerbread at all; I just hated the processed version. Homemade gingerbread is in a completely different league, and now it’s something I genuinely love.

The kids and I love making these gingerbread cookies in all shapes – not just gingerbread men. But you can even just make them into a circle, if that’s what you have on hand! 

Gingerbread Cookies Recipe - NO FAKE FLAVORS

Some Quick History on Gingerbread Cookies

Gingerbread has a long history that dates back thousands of years, beginning with the use of ginger as a spice in ancient civilizations. Ginger was prized in China and the Middle East for both its flavor and medicinal qualities, and it made its way to Europe through the spice trade around the 11th century. Early forms of gingerbread were not cookies as we know them today but rather dense cakes or breads sweetened with honey and flavored with ginger and other warming spices. By the Middle Ages, gingerbread had become especially popular in Europe, where it was often baked by monks and sold at fairs, markets, and festivals.

Over time, gingerbread evolved from a simple spiced bread into more decorative and varied forms. In England and Germany, bakers began shaping gingerbread into figures, animals, and elaborate designs, sometimes decorated with icing or gold leaf. Gingerbread cookies became closely associated with celebrations and holidays, particularly Christmas, because spices like ginger, cinnamon, and cloves were considered special and festive. By the time gingerbread made its way to America with European settlers, it had firmly become a beloved seasonal treat—one rooted in tradition, craftsmanship, and the comforting flavors that still define gingerbread cookies today.

Notes on the Steps to Gingerbread Cookies

When it comes to making gingerbread cookies – or any cookies, following the steps matters more than people realize. Each stage—creaming the butter and sugar, adding eggs at the right time, and slowly incorporating the dry ingredients—plays a role in creating the proper texture. You can’t just throw everything into a stand mixer or mixing bowl and expect great results, because doing so prevents the ingredients from combining correctly. Skipping or rushing steps can lead to cookies that are dense, tough, or unevenly mixed, whereas taking the time to follow the process ensures a tender, balanced cookie with the texture it’s meant to have.

Gingerbread Cookies Made with Cookie Cutters

Gingerbread Cookies (that actually taste delicious!)

No fake flavors. Just fun delicious cookies to make with the kids!
Prep Time 20 minutes
Cook Time 10 minutes
Chill Time 1 hour
Total Time 1 hour 30 minutes
Course Dessert
Servings 40 Cookies

Equipment

  • 1 Stand Mixer/Hand Mixer

Ingredients
  

  • 1.75 Cups Butter (3 1/2 sticks)
  • 1.5 Cups Brown Sugar Light or dark will work.
  • 2 T Vanilla Extract
  • 2 Eggs
  • 1.5 cups Blackstrap Molasses - unsulphured If you lightly coat olive oil in the measuring cup before you put in the molasses, it will slide right out!
  • 2 T Ground Ginger
  • 4 t Ground Cinnamon
  • 1 t Salt
  • 1 t Baking Soda
  • 1 t Cream of Tartar
  • 1/2 t Ground Clove
  • 900 grams All Purpose Flour This is 7.5 cups. I always recommend weighing your flour for cookies (and all baking), as flour weight can vary so drastically. But if you don't have a scale, simply spoon your flour into the cup instead of scooping it out of the compacted bag or container.
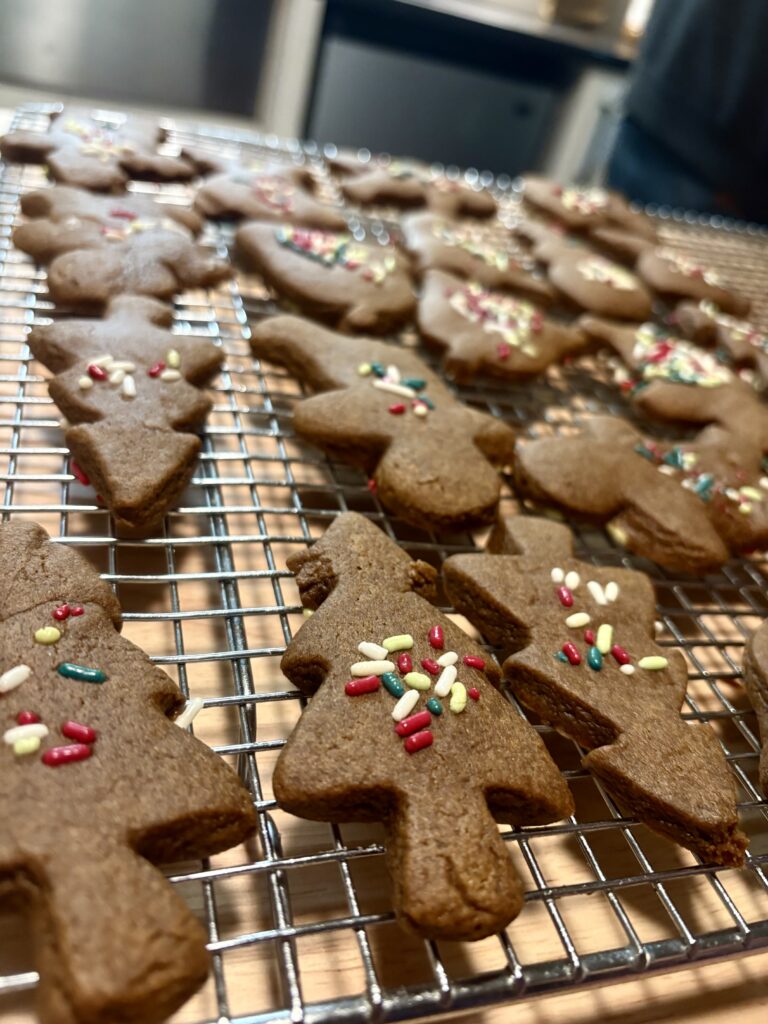
  • 1/4 Cup Dye Free Sprinkles This is totally optional, of course.

Instructions
 

  • Put the paddle on your stand mixer, use a hand mixer, or simply use a good old bowl and wooden spoon. You need to cream the butter and brown sugar. If you do it in the stand mixer, you'll want to mix for about 5 minutes on a medium speed. It should be very creamy and light when it's ready. Scrape down the bowl.
  • Add in the vanilla extract and eggs. You're going to make this mixture light and creamy again. Scrape down the bowl.
  • Add in the molasses. Mix about 1 minute. Scrape down the bowl well, since the molasses is so sticky.
  • Add in the ginger, cinnamon, salt, baking soda, cream of tartar, and clove. I try to put this right in the middle of the bowl as to not let it blow up on the sides of the bowl. Mix on a low speed to prevent the dry ingredients from blowing around too much. Mix these dry ingredients in till well incorporated. Scrape down the bowl.
  • Adding flour to your cookies is an important step that CANNOT BE OVERMIXED. Overmixing is detrimental to cookies, as it makes them tough. Add the flour in 2 additions. Mix it until JUST incorporated. When you don't see flour streaks anymore, STOP mixing.
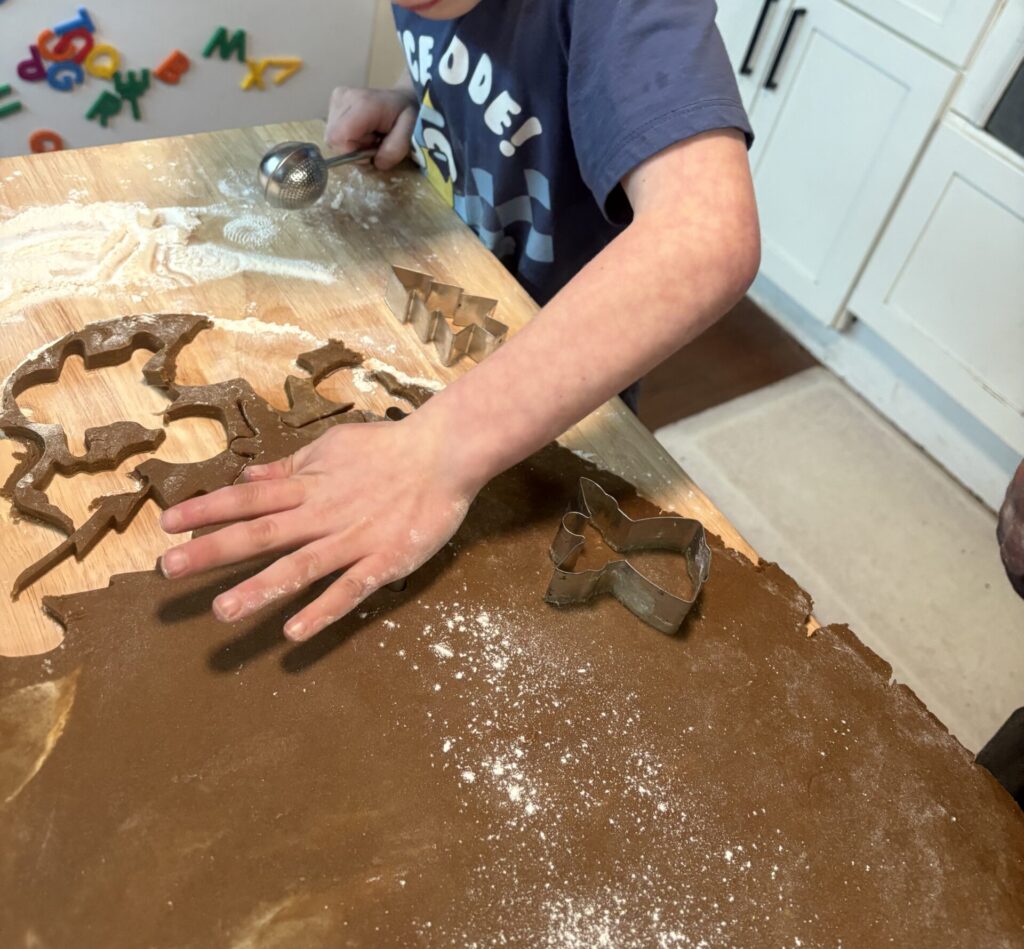
  • Lay down a large piece of plastic wrap on a 1/2 sheet pan (I know, I hate plastic, too, but it's the easiest way to do it without a mess). Flip your cookie dough out of the mixing bowl and onto the plastic wrap on the 1/2 sheet. Flatten it with your hands, lay another piece of plastic over top, and roll out with a rolling pin over the plastic. Make the dough about 1/2" thick. Put in the fridge for about an hour.
  • Preheat your oven to 350° when you have 15 minutes left on the fridge chill. Pull your dough out of the fridge at the 1 hour mark (or it can sit for several hours to days, of course). Roll your dough with the rolling pin to about 1/4" thick. Stamp out your cookies with your favorite cookie cutters or even just a circle biscuit cutter. We pressed some dye free sprinkles into our cookies gently at this point, but you can of course omit this step.
  • Lay the stamped cookies on a parchment lined 1/2 sheet. Bake for approximately 8-10 minutes. Ours took 8 mins, and they were slightly underdone as to finish on the sheet after pulling them from the oven. All of our cookies were "normal" cookie size at about 3" tall or so.
  • If you don't use all your dough, you can wrap it in plastic and put it in the fridge to use another day. If you don't use it after a few days, pop it in the freezer to use later! This is such a fun recipe to do with kids. Our kids love mixing, rolling, and stamping - and of course eating 🙂
Keyword christmas cookies, gingerbread cookies, Kid Friendly

Share this post